Pineapple Bun Recipe (Hong Kong Style)
The pineapple bun is a kind of sweet bread from Hong Kong. It is said that because the pineapple bun has a golden brown surface after baking, the way it is scored on the surface, and its sweet taste- this is where it had adopted its name.
Servings 4
Ingredients
- 100 grams of high-gluten flour
- 20 grams of low-gluten flour
- 60 grams of water
- 12 grams of butter
- 20 grams of fine sugar
- 5 grams of powdered milk
- 2 grams of dry yeast
- 1 tablespoon 15 ml egg (whole egg, whisked).
- 1/4 tsp salt 1.25 ml
- 40 grams low-gluten flour
- 24 grams butter
- 12 grams egg (whole egg, whisked)
- 20 grams powdered sugar
- 1/2 tsp (2.5 ml) of milk powder
Instructions
- As shown above, all dry ingredients (flour, sugar, milk powder, dry yeast, salt, etc.) that make the bread are first mixed together.
- Then add egg and water, and start the dough.
- At first the dough will be very sticky, but as you continue to knead, it will start to take shape.
- As you continue to knead the dough, it will become more fortified, but still elastic, then you can add butter.
- Add the softened butter to the dough and continue to knead it until the butter is completely blended with the dough.
- Sweet bread usually only needs to be kneaded to the proofing stage. If we continue to knead, the dough will be tougher and harder to work with. So only knead until it is elastic and smooth.
- As shown above, the dough is then rolled into a ball.
- The kneaded dough is placed in a large bowl, covered with plastic wrap, and the first proofing is performed (about 1 hour at room temperature of 25°C. The lower the temperature, the longer it will take to proof, as yeast is activated by moisture and heat).
- While we are waiting for this first dough to proof, we can start making the outer layer of the pineapple buns-
- Mix sugar powder, milk powder and softened butter.
- Whip evenly with a whisk.
- Add the eggs in two portions. Add half, mix, add the other half.
- The flour is sifted into the butter paste and mixed with a spatula.
- Mix the moist batter with no dry flour and the mixture is ready.
- Flour your hands and countertop to prevent sticking, knead this mixture into a bar-type shape.
- Then cut into 4 pieces.
- When your first dough is ready, you will notice that it has grown significantly larger.
- To test, you can gently stick a finger into the dough and remove, it should hold its form.
- Once the dough is completed, take it out of the bowl and divide into 4 equal parts and roll into balls (the air in the dough will escape, this is normal). Let sit for about 15 minutes or so.
- Next, take one of the 2nd type of dough balls we made, and flatten between your hands. (this is the outer layer)
- Take one of the first dough balls, cover with the outer layer while slowly rotating. It may take some time and practice to get this step down correctly, just take your time.
- Place the wrapped dough on the countertop (the entire thing doesn’t need to be covered; you can place the part that isn’t covered face-down).
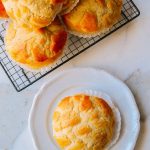
- Use a dough knife to gently score the famous checkered pattern into the top (don’t cut all the way through the outer layer).
- Place the buns on a baking tray that has a sheet of baking paper on it, and then we will begin the final proofing (recommended proofing temperature is 35°C and humidity 80%, approximately 45 minutes). In winter, you can put the hotplate on top of the oven, put a plate of hot water on the bottom, and close the oven door so that the oven has sufficient temperature and humidity. Summer can be directly fermented at room temperature (Because there is an outer layer covering the dough, it is possible to proof on the counter during the summer).
- After the final proof (the volume becomes 2-2.5 times larger), remove the hotplate and hot water from the oven. Preheat oven to 170 °C upper and lower heat sources, after preheating, put the pan into the middle, bake about 15 minutes (please adjust the baking temperature and time according to the actual situation of the oven), and your pineapple buns are done and ready to enjoy!