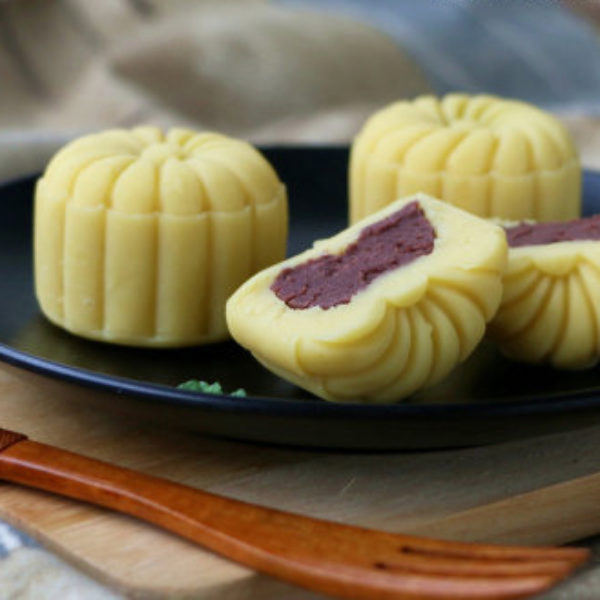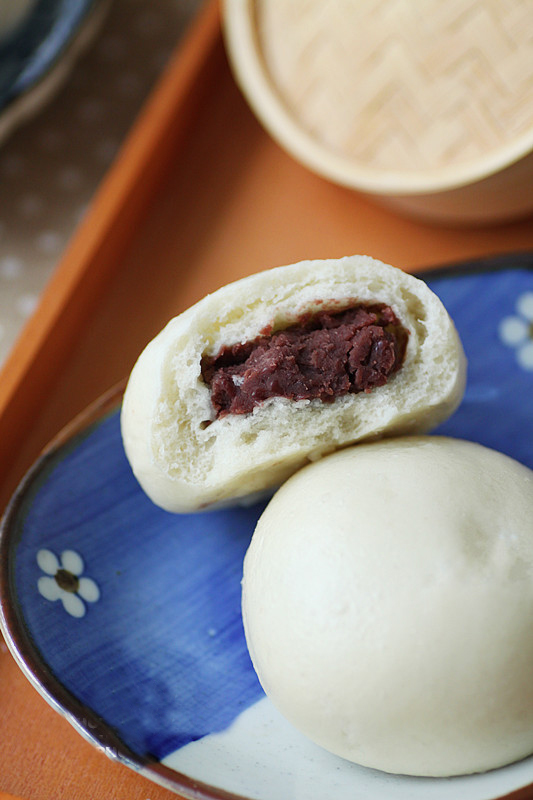
Red Bean Buns were one of my childhood favorites. Whenever my mother made this delicious snack, I loved helping her by wrapping up the little balls of bean paste with the dough.
Red Bean Buns are a Chinese snack food originating in Beijing and Tianjin Han.
Not only are they a nice kids’ snack, but they are also a great starter to a meal and perfect as finger food for parties.
I shared my Chinese Steamed Buns recipe a while back, but today we’re going to take it to another level.
So, grab your kids and join me in making Red Bean Buns.
Ingredients
500 g flour
5 g yeast powder
10 g baking powder
250 ml milk or water
250 g uncooked red beans
50 g sugar
Method
The first thing you need to do is make the red bean paste stuffing.
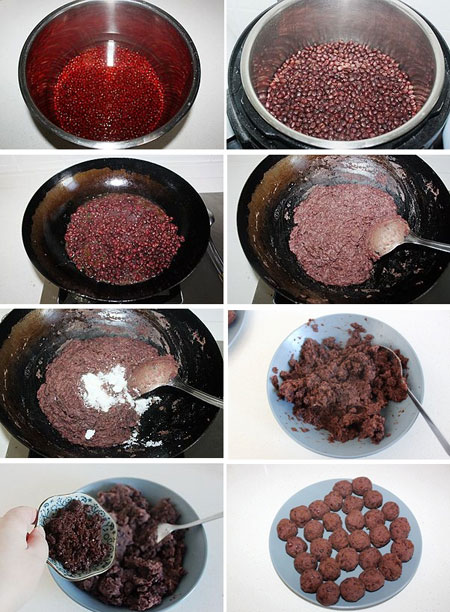
Step 1
Place the red beans into the pressure cooker and cover with water 5 cm from the top of the cooker. Set the electric pressure cooker to the boil beans function, and simmer on low for 20 minutes.
Turn off the pressure cooker and allow it to release the water vapor, then remove the beans.
Heat the butter in the wok and add the cooked red beans. As you stir the beans, mash them with the back of the spoon and keep stirring.
Add the sugar, stirring it in evenly to combine for a few minutes until the mashed beans become a thick paste. Turn off the wok.
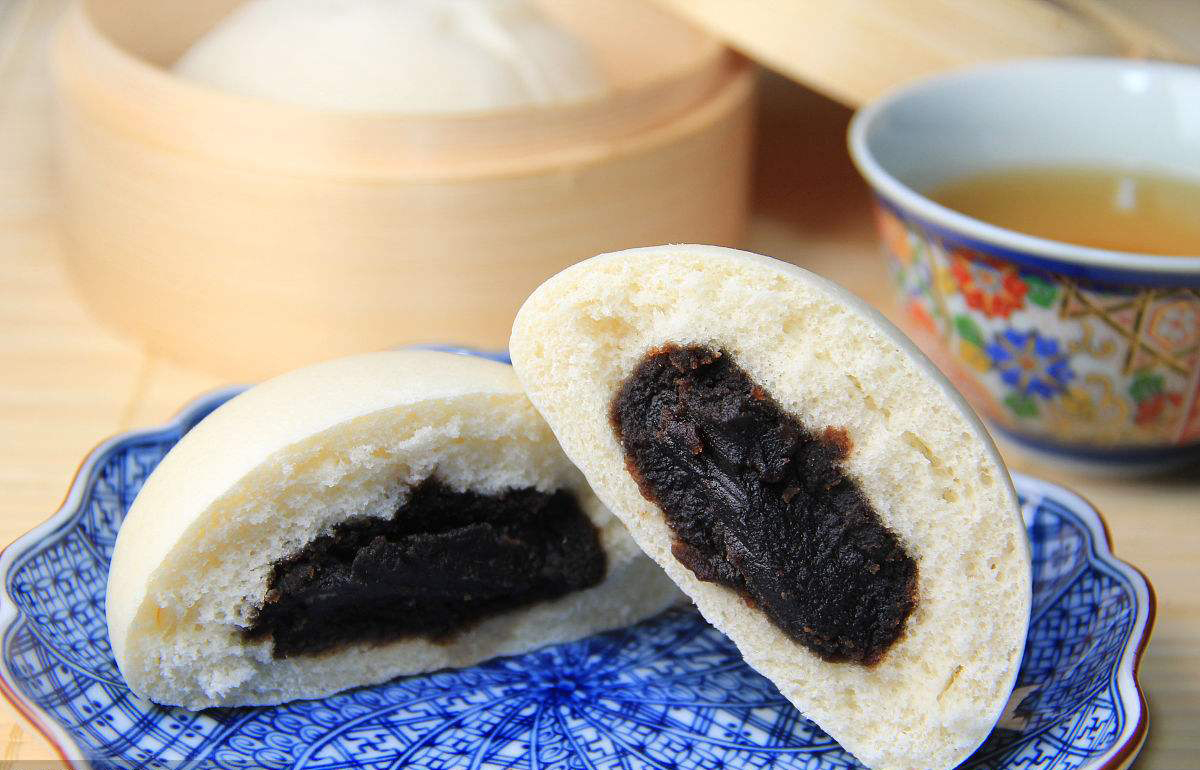
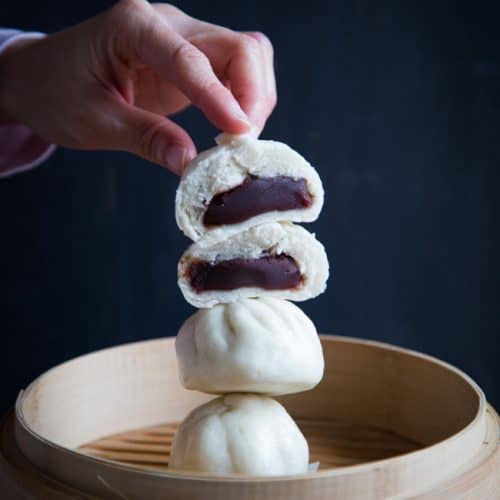
Once the bean paste is cool it will be drier and easier to handle. Roll the paste into balls about the size of a walnut.
Step 2
The second step is to make the dough.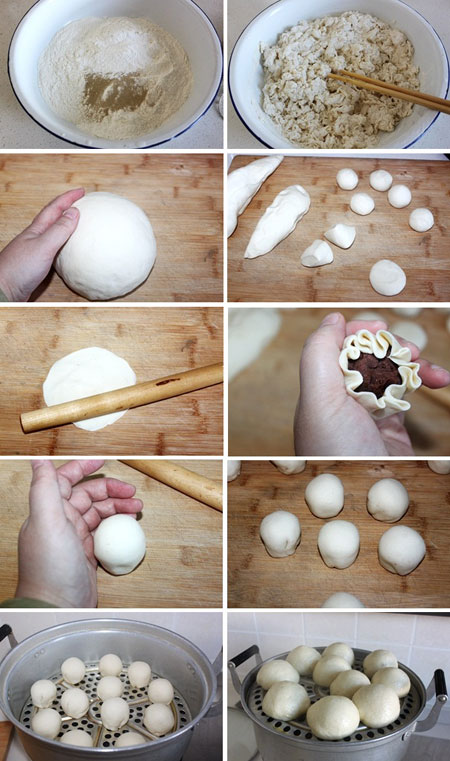
Measure the flour into a basin, add the yeast and baking powder and mix to combine.
Next, pour in the milk or water and stir with chopsticks until the dough starts to come together, and looks tangled and still a little dry.
Water absorption will differ depending on the environment, but the dough needs to be a little dry at this point as it will soften to the right texture when you knead it.
Bring the dough together with your hands and knead it by hand for 30-40 minutes, or you can pop it into your bread machine to knead for 10 minutes. The dough will be proved in the steamer after it is stuffed with the bean paste.
Step 3
Divide the dough into the same amount of portions as you have bean paste balls. Form each portion into a round and roll it out big enough to enclose the bean paste ball with a little extra to overlap and seal the paste in.
Roll the dough rounds so that they are a little thicker in the middle, and thinner around the edges as these will be overlapped to seal in the bean paste ball.
Place the dough flat in your palm, place a bean paste ball on top and scrunch the dough around it, sealing it in by pinching the edges together to enclose the ball completely.
Clench your hand around it tightly, to bond the two together, being careful not to distort the nice round shape.
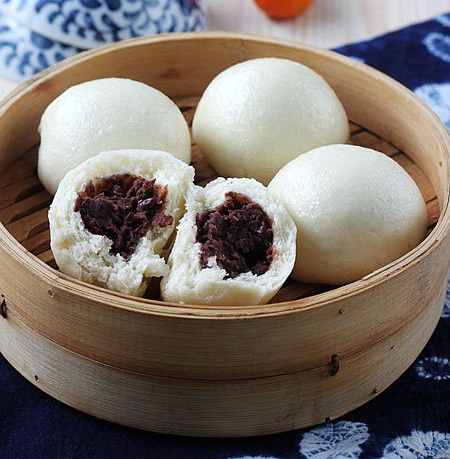
Step 4
Fill your steamer with 5cm of water and heat on low for half a minute and turn off. Place the bean paste buns, sealed side down, on the bottom rack making sure there is plenty of clearance around each bun, so they do not stick to the sides or each other when they rise.
Cover with the lid and leave for 20-30 minutes until the buns have doubled in size. (The time is not too exact because the ambient temperature will differ depending on your environment.) Open the lid now and then to check their progress.
Step 5
Once the buns have risen set your steamer rack to the high position, and steam to cook the buns for a further 15-20 minutes.
Setting them higher to cook ensures the buns don’t come in contact with too much direct moisture, which would cause them to collapse.
Cooking Tips
- The amount of sugar added to thebean paste filling does not need to be exact. Add more or less according to your preference.
- After cooking the red beans, they can be mashed in a food processor and will have a smoother taste and texture, but I prefer the rougher texture that manual mashing produces. Again, it’s a matter of preference.
- Do notroll the dough too thin;otherwise it will not turn out fluffy when it is cooked.
- The normal fermentation process for a yeast dough requires it to prove twice, once before you shape it, and again after it has been shaped into the buns or loaf.But in this recipe, I have added baking powder which means it only has to prove once. Using baking powder as well as yeast is simple and time-saving. You can form the dough into your desired shape (loaf, buns, etc.) and prove it only once, then cook it.
Tips for Making Dough
- Points to note to achieve a smooth, soft, white doughby hand:
Firstly, you should choose a high-quality flour.
Secondly, kneading needs to be thorough for the gluten to develop in the dough and of course doing this in a machine is easier and more convenient. If you knead by hand, it will take at least 30 – 40 minutes.
Thirdly, to make a smoother dough, sift the flour first.
- About Fermented Dough
Proving dough can be a tricky business sometimes, and needs close attention. If the temperature is too high or too low, it can easily ruin the dough. Generally, 40 minutes at 28 degrees is best, but this will change depending on the time of year.
In summer it may only need about 25 minutes, and in winter you may need to put the dough in the warmest part of the house.
So, the time dough needs to prove varies, meaning observation is necessary to determine when the dough has fermented for long enough.
The dough is ready when it has risen to twice its original size.
You can also test if the dough is ready by poking your fingers into it, and if the dough collapses immediately, it will not rise when steaming and it will taste hard.
- Should You Put Hot or Cold Water in the Steamer?
There are differing opinions about whether to cook the buns starting with cold water and heating them up to cooking temperature, or starting out with hot water.
It all depends on how well the buns rose in the proving stage. If the dough rose well, then you can start with hot water and get them cooking straight away.
However, if the fermentation process did not go well, starting with cold water will help the dough complete the fermentation as the water heats up to hot enough to cook the buns.
- Steaming the Buns
The buns should be steamed on low. Steaming at a higher temperature will cause too much steam and condensation forming on the lid will drip onto the surface of the buns, causing an uneven texture.
It is also important to leave the lid on for a few minutes after the buns have cooked to allow them to cool down slowly at first.
If the lid is removed as soon as you turn off the stove, the buns will cool too quickly, and the surface of the buns will shrink.
Leave the lid on after they have finished cooking for 3-4 minutes to allow the steam to dissipate and then remove the lid.
Red Bean Buns – Simple Chinese Bread
Ingredients
- 500 g flour
- 5 g yeast powder
- 10 g baking powder
- 250 ml milk or water
- 250 g uncooked red beans
- 50 g sugar
Instructions
- The first thing you need to do is make the red bean paste stuffing.
- Place the red beans into the pressure cooker and cover with water 5 cm from the top of the cooker. Set the electric pressure cooker to the boil beans function, and simmer on low for 20 minutes. Turn off the pressure cooker and allow it to release the water vapor, then remove the beans.
- Heat the butter in the wok and add the cooked red beans. As you stir the beans, mash them with the back of the spoon and keep stirring. Add the sugar, stirring it in evenly to combine for a few minutes until the mashed beans become a thick paste. Turn off the wok.
- Once the bean paste is cool it will be drier and easier to handle. Roll the paste into balls about the size of a walnut.
Make the dough
- Measure the flour into a basin, add the yeast and baking powder and mix to combine. Next, pour in the milk or water and stir with chopsticks until the dough starts to come together, and looks tangled and still a little dry.
- Water absorption will differ depending on the environment, but the dough needs to be a little dry at this point as it will soften to the right texture when you knead it.
- Bring the dough together with your hands and knead it by hand for 30-40 minutes, or you can pop it into your bread machine to knead for 10 minutes. The dough will be proved in the steamer after it is stuffed with the bean paste.
- Divide the dough into the same amount of portions as you have bean paste balls. Form each portion into a round and roll it out big enough to enclose the bean paste ball with a little extra to overlap and seal the paste in. Roll the dough rounds so that they are a little thicker in the middle, and thinner around the edges as these will be overlapped to seal in the bean paste ball.
- Place the dough flat in your palm, place a bean paste ball on top and scrunch the dough around it, sealing it in by pinching the edges together to enclose the ball completely. Clench your hand around it tightly, to bond the two together, being careful not to distort the nice round shape.
- Fill your steamer with 5cm of water and heat on low for half a minute and turn off. Place the bean paste buns, sealed side down, on the bottom rack making sure there is plenty of clearance around each bun, so they do not stick to the sides or each other when they rise.
- Cover with the lid and leave for 20-30 minutes until the buns have doubled in size. (The time is not too exact because the ambient temperature will differ depending on your environment.) Open the lid now and then to check their progress.
- Once the buns have risen set your steamer rack to the high position, and steam to cook the buns for a further 15-20 minutes. Setting them higher to cook ensures the buns don’t come in contact with too much direct moisture, which would cause them to collapse.